Arranging and Lighting Your Military Patch Collection

Most collectors believe that a high-quality display case or a glass shadow box is the only way to protect a collection, but they're often wrong. While physical protection is one part of the equation, the way you arrange and light your military patches, caps, and small-scale collectibles dictates whether your collection looks like a curated museum piece or a cluttered junk drawer. This post explores the technical side of display—specifically how to organize your items for visual impact and how to light them without causing irreversible UV damage.
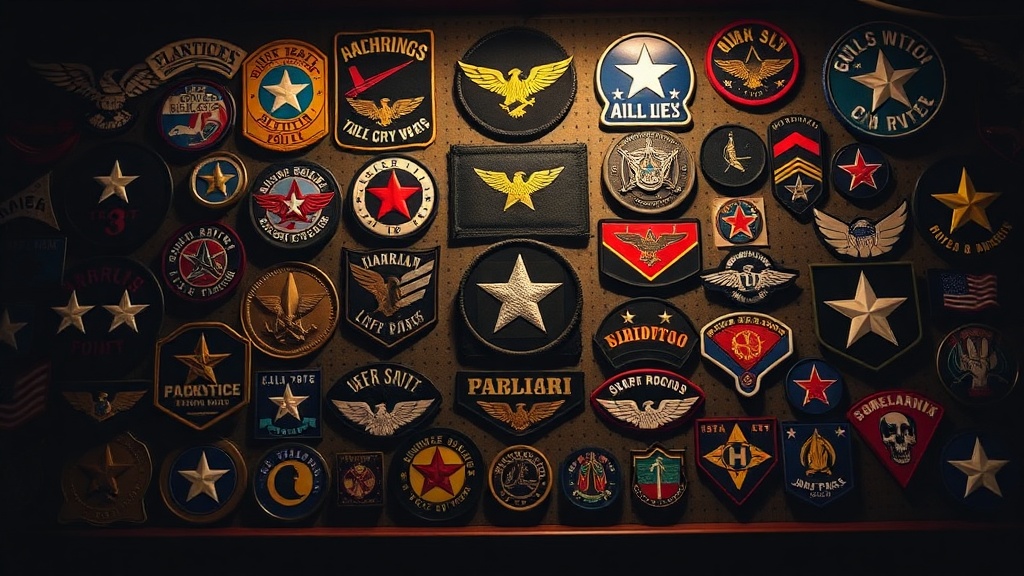
How Do You Arrange Patches for Maximum Visual Impact?
Effective arrangement relies on grouping items by era, unit, or visual weight rather than just piling them together. If you have a collection of vintage WWII embroidered patches, they shouldn't sit next to a modern PVC unit patch from a recent deployment unless there is a clear thematic connection. A disorganized pile hides the very details you spent money to acquire.
Start by categorizing your "Smalls." This includes things like challenge coins, small brass insignia, or even certain bottle cap collectibles. You want to create a sense of hierarchy. The largest, most visually striking items—perhaps a large embroidered patch or a heavy-duty cap—should serve as the anchor points of your display.
Here’s a simple way to structure your layout:
- The Anchor: Place your largest or most significant item (like a framed ceremonial cap) in the center or slightly off-center.
- The Mid-Tier: Group medium-sized items, such as standard unit patches, around the anchor to create a visual flow.
- The Accents: Use smaller items like challenge coins or specialized pins to fill the gaps and add texture.
- The Negative Space: Don't crowd everything. Leaving a little breathing room between items makes each piece stand out more.
I’ve seen too many guys buy a beautiful shadow box and then just jam twenty patches in there until it looks like a mess. (It’s a common mistake, trust me.) If you want to show off the craftsmanship of a high-end piece, give it room to breathe. If the items are too close, the eye doesn't know where to land.
If you are dealing with older textiles, remember that how you hang or mount them matters for long-term survival. You might want to check out my previous guide on preserving vintage embroidered patches from fabric decay to ensure your arrangement isn't actually hurting your items.
What Is the Best Lighting for Military Collectibles?
The best lighting for military collectibles is cool-temperature LED light that lacks UV emissions. Sunlight is the enemy of any collector. If you place a display case near a window, the UV rays will eventually bleach the thread colors in your patches and fade the dyes in your vintage caps. You'll end up with a dull, gray version of what you once proudly owned.
Avoid traditional incandescent bulbs. They generate heat, and heat is a silent killer for textiles and plastics. If you're using a display case with integrated lighting, make sure it's a "cool" light source. LED strips are your best friend here. They provide consistent light without the heat buildup that can warp a plastic bottle cap or dry out old fabric fibers.
Consider these three lighting directions:
- Ambient Light: The general light in the room. Keep this low to prevent overall fading.
- Accent Light: Small-scale lights (like LED strips) used to highlight specific groups of patches.
- Directional Light: Using a spotlight effect to draw attention to a "hero" piece, like a rare commemorative bottle or a high-value insignia.
A quick tip: if you're using a glass display case, watch out for reflections. If the light hits the glass at a certain angle, you won't see the patch; you'll just see a bright white glare. Adjust your light source slightly to the side rather than directly in front of the item. This creates depth and prevents that annoying glare.
How Much Does a Professional Display Setup Cost?
A professional display setup can cost anywhere from $50 to over $500 depending on whether you go the DIY route or buy a pre-made solution. For a budget-conscious collector, you can build a decent setup using basic shadow boxes and standalone LED strips from a hardware store. However, high-end, museum-grade cases with UV-filtering glass will demand a much higher investment.
It’s worth noting that the cost isn't just about the box; it's about the protection. If you're collecting high-value items, you might want to look into specialized cases. For example, if you're collecting certain types of metal-based insignias or specialized bottles, you need to consider the weight and the stability of the shelf.
| Setup Type | Estimated Cost | Primary Benefit | Best For |
|---|---|---|---|
| DIY (Basic Shadow Box) | $20 - $60 | Low cost, high customization | Standard patch collections |
| Mid-Tier (LED Integrated) | $100 - $250 | Great visual "pop" | Mixed collections (Caps & Patches) |
| Premium (UV-Protected Glass) | $500+ | Maximum preservation | High-value or vintage items |
If you're just starting out, don't go overboard. You'll likely change your collecting style as you grow. You might start with patches but realize you're actually much more interested in specialized military bottles or high-end headgear. A modular-style setup is much more forgiving than a single, massive, expensive display case.
When you're looking at materials, check the specifications. If you're buying a case for a collection of metal insignia or heavy caps, make sure the shelf material can handle the weight. A flimsy plastic shelf will bow over time, which looks terrible and can eventually break. I always suggest checking the weight capacity of any display unit before you commit. You can find general information on material durability through sites like Wikipedia to understand the different types of acrylic and glass available.
One thing to keep in mind: if you're displaying metal items like certain challenge coins or heavy brass insignia, do not let them touch the fabric of your patches directly. Metal can sometimes react with the dyes or the thread, especially in humid environments. Use small, clear stands to keep them elevated. This adds a professional "museum" look and prevents any potential staining or damage to your textiles.
If you're looking for more deep-dives into the technical side of building a collection, check out my guide on building a serious collection. It covers the foundational steps before you even get to the display phase.
Lighting and arrangement aren't just about making things look "pretty." They are about control. You're controlling how people see your collection, and more importantly, how much time your collection survives. A well-lit, well-organized display tells people you're a serious collector, not just someone with a pile of stuff in a box. It turns a hobby into a legacy.
Steps
- 1
Select a Depth-Appropriate Shadow Box
- 2
Plan Your Layout and Spacing
- 3
Install UV-Filtered Lighting
- 4
Secure Patches with Adhesive Backing