Cleaning and Restoring Vintage Embroidered Patches Safely

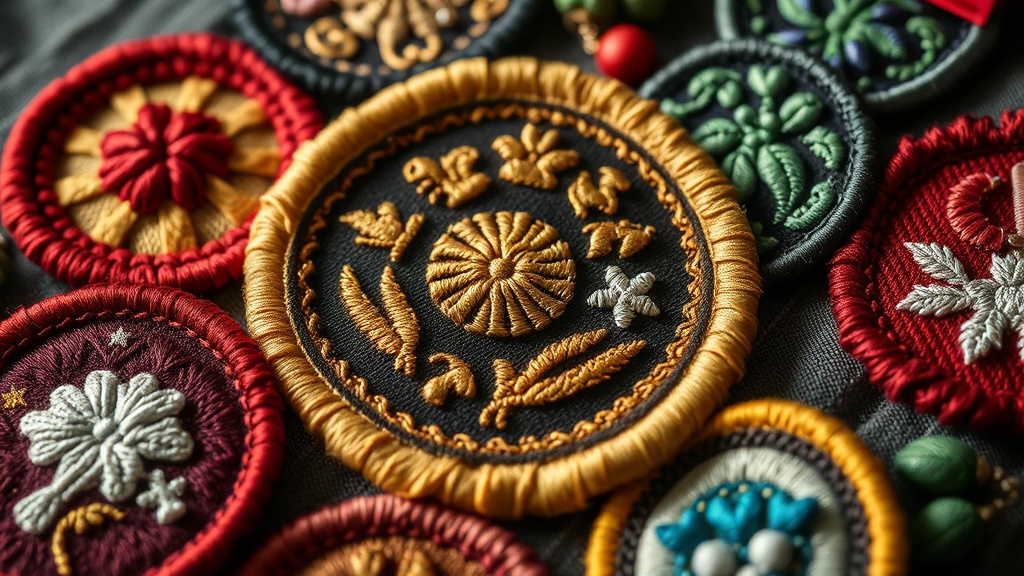
A single stray thread hangs from a 1940s divisional patch, heavy with decades of dust and the faint, metallic scent of old textile oils. The colors are muted, not by design, but by the slow accumulation of grime and environmental exposure. If you've recently acquired a vintage piece, you know the struggle: it looks dull, lifeless, and perhaps a little bit grimy. This guide explains how to clean and restore those fragile embroidered pieces without destroying the very fibers that give them value.
Cleaning vintage patches is a high-stakes game of patience. One wrong move with a harsh chemical or a heavy scrub brush and you've turned a collectible into a rag. You aren't just cleaning fabric; you're preserving history. We'll look at the specific tools, the safe methods, and the hard limits of what you can actually fix.
How Do You Clean Vintage Embroidered Patches Safely?
The safest way to clean a vintage patch is through a gentle, dry brush technique followed by a controlled, lukewarm water soak if absolutely necessary. Most collectors should avoid submerging a patch unless the buildup is significant. You want to remove surface dust first to prevent turning that dust into mud during a wet wash.
Start with a soft-bristled brush—think a clean, soft toothbrush or a high-quality makeup brush. Gently flick the bristles across the embroidery to lift away loose debris. This is vital because if you jump straight to water, the dust becomes a sludge that settles deeper into the thread grooves. It’s a common mistake that ruins the look of the piece.
If the patch is still looking dull, you can move to a "spot clean" approach. Use a tiny amount of pH-neutral soap—something like a gentle mild cleanser—diluted in a bowl of lukewarm water. Never use bleach or harsh detergents. They will eat through the cotton or rayon threads faster than you can blink.
The Cleaning Hierarchy:
- Dry Brushing: Best for light dust and loose debris.
- Damp Wiping: Using a slightly damp microfiber cloth for localized stains.
- Submersion: Only for heavy grime, using distilled water and neutral soap.
Can You Use a Washing Machine for Old Patches?
No, you should never put a vintage embroidered patch in a washing machine or a dryer. The mechanical agitation of a washing machine is too aggressive for aged, brittle threads, and the heat from a dryer is the fastest way to shrink the backing or melt synthetic fibers. It's a recipe for disaster.
Think about the construction of these items. A vintage patch often has a backing made of felt, wool, or even a stiffened canvas. A washing machine's spin cycle can warp these materials, leaving your patch looking wavy or stretched out. If you've already learned about preserving vintage embroidered patches from fabric decay, you know that structural integrity is everything. A machine wash destroys that integrity.
Even if the patch looks like a modern, heavy-duty PVC or embroidered patch from a modern retailer, the "vintage" aspect changes the rules. Old thread is often more brittle due to oxidation. A single cycle could cause the embroidery to unravel or the base fabric to disintegrate. It's just not worth the risk.
What Are the Best Tools for Patch Restoration?
Restoration is about subtlety. You aren't trying to make a 70-year-old patch look brand new; you're trying to make it look its best for its age. If you try to make it look "new," you often strip away the character that collectors actually value.
Here is a breakdown of the toolkit you should keep on hand for your collection:
| Tool | Purpose | Caution |
|---|---|---|
| Soft Toothbrush | Removing dry dust and surface debris. | Don't scrub too hard; you'll fray the threads. |
| Distilled Water | Rinsing and gentle cleaning. | Avoid tap water if it has high mineral content. |
| Microfiber Cloth | Dabbing moisture away from the surface. | Never rub; only dab or "blot." |
| pH-Neutral Soap | Breaking down oils or light stains. | Avoid any soap with perfumes or bright dyes. |
If you encounter a stubborn stain, a cotton swab (Q-tip) is your best friend. It allows for precision. You can apply a tiny amount of diluted soap to the swab and work it into the specific area. This prevents the liquid from spreading to parts of the patch that don't need it. It’s a slow process, but it's the only way to ensure you don't cause collateral damage.
One thing to watch out for is the type of thread. Older patches often use silk or high-quality cotton, while later 20th-century patches might use rayon. Rayon is much more sensitive to water. If you see the threads looking "fuzzy" or losing their sheen after a cleaning, you've likely used too much moisture or the wrong pH level. It’s a heartbreaking sight for any collector.
When dealing with heavy-duty items like patches that were part of a uniform, you might find more stubborn grime. In these cases, a very mild solution of distilled water and a drop of extremely gentle soap is your limit. Don't get ambitious. A little goes a long way.
It’s also worth noting that some collectors use a specialized brush for cleaning fine details. If you're working on a patch with very intricate, small lettering, a standard toothbrush might be too blunt. A fine-tipped artist's brush can work wonders for getting between the raised embroidery lines. This level of detail is what separates a "cleaner" from a "restorer."
Once you've finished the cleaning process, the drying stage is just as important. Never wring a patch out. Lay it flat on a clean, white towel. Let it air dry in a cool, shaded area. If you're in a hurry, you can use a fan to circulate air, but stay far away from any heat source. Heat is the enemy of vintage textiles. It causes shrinkage and can make the adhesive in certain backings fail. If you're looking to display your cleaned pieces, check out my guide on arranging and lighting your military patch collection to see how to showcase them properly once they're dry.
The goal is a clean, presentable piece that still retains its historical "soul." If you find yourself staring at a patch that is literally falling apart or has significant thread loss, stop. At that point, cleaning won't help. You can't clean away structural decay. At that stage, the patch is a museum piece that should be preserved as-is, rather than attempting a restoration that might finish it off.
Keep your tools organized and your movements slow. The more careful you are, the longer your collection will live. A little bit of patience goes a long way in this hobby.
Steps
- 1
Assess Fabric Integrity
- 2
Dry Brushing for Loose Debris
- 3
Mild Solution Spot Cleaning
- 4
Air Drying Procedures